Showing posts with label adapter. Show all posts

Friday, August 10, 2012

Installing an IC-10 kit into a Kenwood TS-440S/AT HF Radio

I use Ham Radio Deluxe, or more specifically, Digital Master 780, for most of the digital mode communications that I do (usually just PSK31).  This software is great and does a lot of awesome stuff.  One of those cool things that you can do with HRD is rig control.  This makes it easy to jump from frequency to frequency (QSY in ham-speak) from within the software, instead of having to tune the radio and adjust the software accordingly.  It also keep your PC up-to-date on what frequency your radio is on for automated logging (really help for lazy guys like me).

Anyway, since I have an older radio, I had to modify it with an add-on kit, originally called the Kenwood IC-10 kit.  Kenwood no longer sell this kit since they made the TS-440 over 20 years ago.  However, since this kit is just basically two ICs (an 8251A and a TC4040BP), they can still be obtained.  I got mine off of eBay for $20.  This will allow 4800 baud serial communications via the ACC-1 interface on the back of the radio.

You can then use a round 6-pin DIN connector and a DB9 connector to make a serial interface cable.  Be careful as the TS-440 ACC-1 interface uses TTL voltages (5V) and serial wants to use 12V, you will either need to use Kenwood's IF-232 kit to match the voltages, or use a USB-to-serial converter with normally operates at TTL voltage levels (beware Prolific chipsets).

The install process is fairly simple, it took me around 20 minutes to complete the installation, including the time it took to take the pictures.


This is a picture of the kit itself, basically a serial UART and a CMOS timer chip.  Be sure to take static precautions, it would be a shame to do this install and have it not work due to fried ICs.  Basically, just stay at the same electrical potential as the radio and you'll be fine.  Never touch the chip without touching the radio first.  You could also use a static strap, although I generally find this to be overly cautious unless you are working with extremely sensitive parts (or extremely expensive ones).

Below is a picture of the radio that we are about to perform surgery one, to wit, a Kenwood TS-440S/AT:

Step one is to remove the top cover, which consists of eight screws (four on top, two on each side):

Be sure when you remove the top that you keep track of where the speaker cable goes so that you can put it back together when you are finished.  It is the yellow cable in this picture:

Next, flip it over and repeat the process with the bottom cover (nine screws this time, five on bottom, two on each side):

After that, remove the three screws on the bottom of the heat shield (silver part to the right with the three holes).  Also remove the four screws (two on each side) that hold the front panel in place:

Then remove the two screws that hold the top of the heat shield on:

Finally, you will be able to see the two sockets for the two ICs.  The part of the IC with the half-circle indicates the location of pin one.  This view is from the top of the radio, and pin one goes to the left:
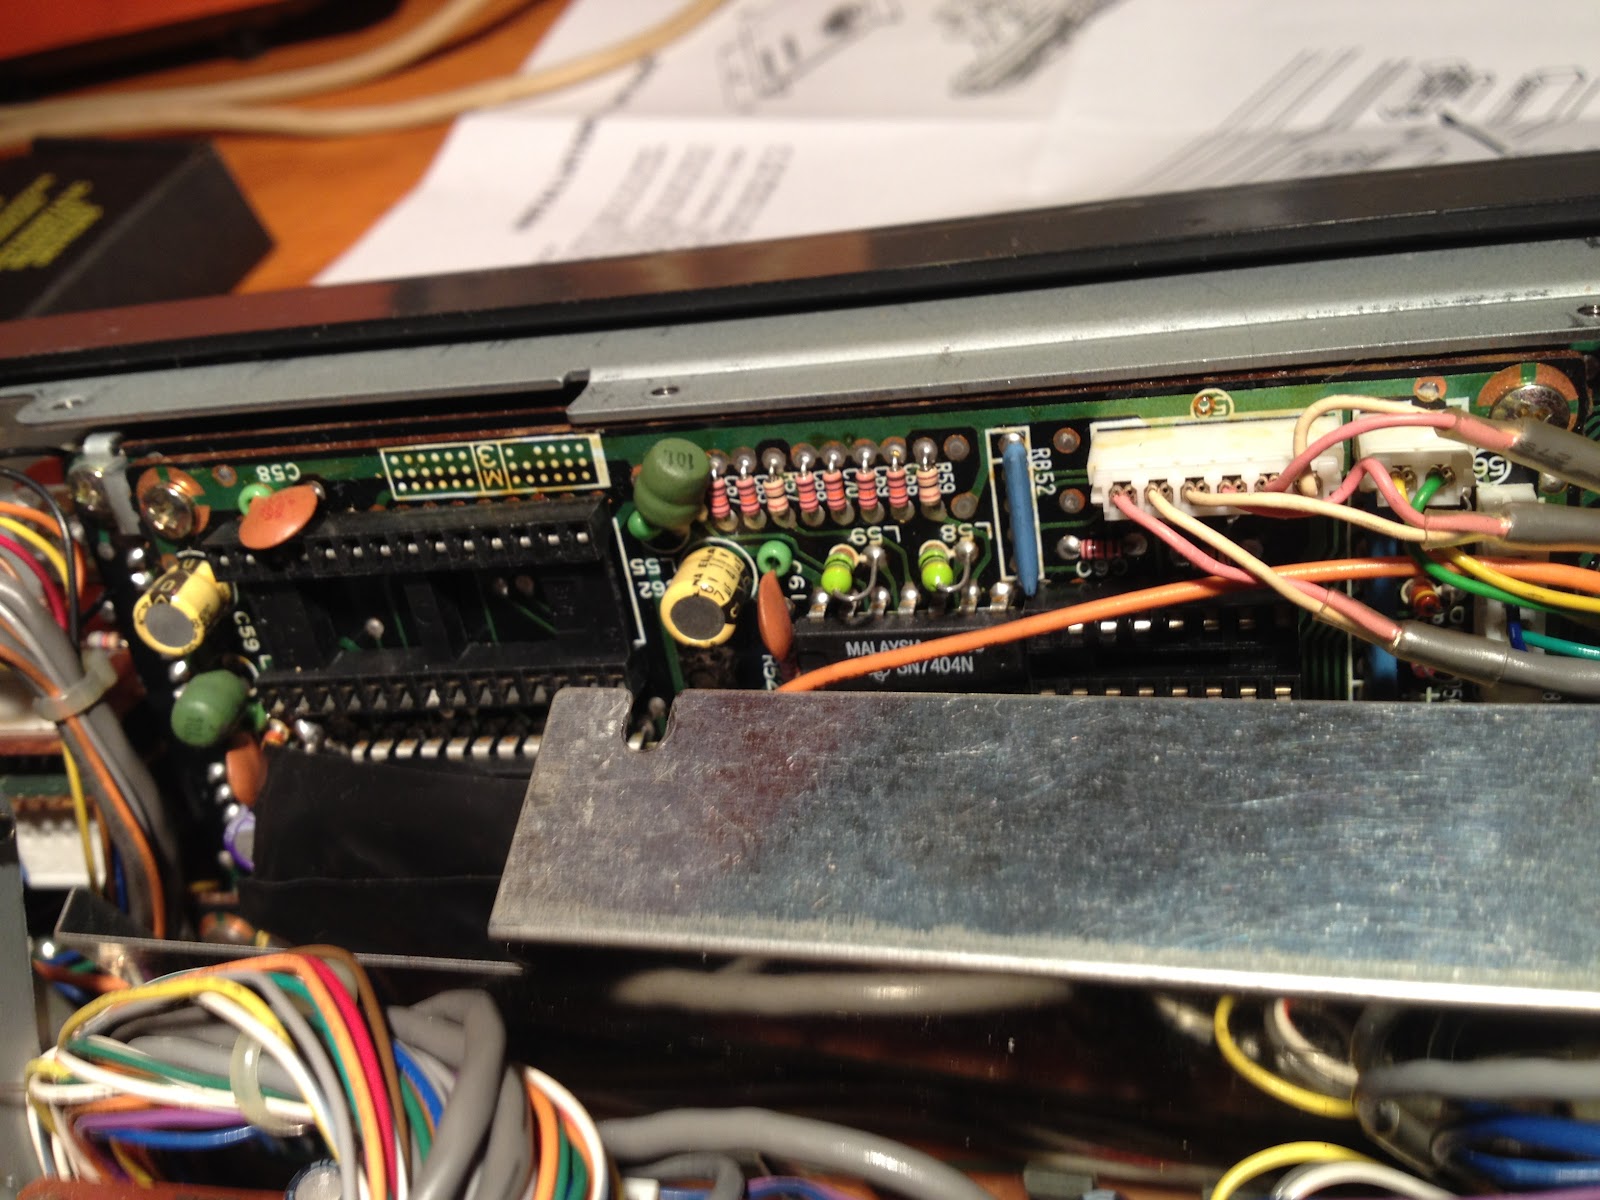
I forgot to take a picture before I put the heat shield back on, but this is what it looks like with the IC installed.  I had to compress the pins on the ICs a bit to get them installed, which is common.  Just be careful not to bend them too much, else they may break.

Put the radio back together in the reverse order of above, and you will be off to the races!

 This is the rig control interface for HRD, you can see where I have set the frequency to the 20m PSK calling frequency:

And this is the radio after reassembly and being controlled by the PC.  The downside to this is that you cannot control the volume, nor can you get current S-level readings from the radio back into the software like you can with newer rigs.  But being able to control a 20 year old radio via the PC at all is awesome!!


Put this project together with the soundcard interface that I build in an earlier post, and you have a fully functional rig for digital modes on the ham bands!  This was a really easy and fun project and I gained a lot of useful functionality from my rig!

73,

Richard, KK4JDO

Sunday, July 22, 2012

A Plethora of Project Boxes

As I was cleaning up after our little project this afternoon, it occurred to me that I am slowly accumulating a plethora of small project boxes.  I find myself picking up another one every time I go to Radio Shack.  In addition to the ones in the picture, I have two more in the parts bin...lol.

Anyhow, just thought that I'd share a picture of them.  I've had a lot of fun so far with these projects, and I'm looking forward to many more!  All that being said, here is a quick pic of my little project boxes:


Starting clockwise from the left, these boxes contain:

  • Soundcard interface for APRS/Packet/and other digital modes
  • PC interface for PTT desk mic and morse code straight key
  • Control box for cycling through (manually, or enabling automatic shifting of) colors on my LED lit glass blocks.
  • Simple Coax Tester

It pains me that I paid around $100 for the SignaLink and associated cables when I could have built an interface for around $20.  Not knocking the SignaLink USB, it is a great device, but I like building things myself when possible.

73,

Richard, KK4JDO

Saturday, July 21, 2012

Soundcard Interface for APRS/Packet - Part 2

Well, I finally got the PTT part of the soundcard interface working.  This was fun, and sometimes frustrating, but very educational.  I am lacking in my understanding of component level electronics engineering.  As a network engineer, I would be comfortable designing and implementing an enterprise network for a new hospital (that's a different story), but understanding why a transistor works the way it does is beyond me at this point.  So I kind of fumbled my way through this.  One thing that is very important in network engineering is attention to detail, and solid planning.  For some reason I didn't carry this over to this project, and it bit me..lol

Let me state, for the record, plan your work, and work your plan.  Don't just wing it.

Okay, on that note, on to the project.  Once again, soundcardpacket.org was a great source of information on getting this part working.  I used this schematic from their site (click on the image to see more details):


R1 = Resistor, e.g. 1K2, to reduce voltage on the IC pin 1
IC =  Integrated Circuit; this sketch shows an IC, such as a 4N33
        or PS2603 Optocoupler, which uses a Darlington pair transistor.
        (Note: to identify pin #1, look for a small embossed circle on
         the top of the IC above pin 1; or looking into the notch in one
         side of the IC with the pins down, pin #1 is to the right of the notch.)
D1 = Diode, e.g. IN4001, would shunt any potential reverse voltage
        that might damage the sensitive diode/emitter in the IC.
        (Note: the band printed on the diode marks the cathode end,
        which attaches to the Serial Port/IC Pin 1 line in the sketch above.
        The opposite/anode end attaches to Ground.)


In the last post about this project, I built the receive and transmit cables that connect the output of the radio to the input on the soundcard, and the output on the soundcard to the input on the radio.  This worked well for listening to APRS and packet conversations, but I couldn't join in without manually keying the mic, which works okay if you're doing PSK31 or other HF digital modes, but isn't as easy with packet or APRS.  With this addition, a signal is sent via the PC's comm port to key the PTT circuit on the radio.  This allows the radio to be keyed via software instead of manually.  This allows things like APRS beacons to work normally.

This particular design uses an optocoupler to isolate the radio and the PC, while still allowing communications to flow.  This, along with the audio transformers used in the last post, helps to eliminate ground loops and voltage differentials, which are a source of hum in your transmission audio.

While building my version, I found that I didn't have the required 1.2K Ohm resistor, so I substituted a 1K and a 220 Ohm resistor in series.  This took a little additional space, which was at a premium in the tiny project box that I used, but ended up working well.  As you'll recall, in the last post, I decided to build this in a project box, instead of as a set of cables.  I think that in the long run my way will be more durable since there will be less movement of the internal solder joints due to cables wiggling around.  Time will tell.

A couple of issues that I ran into:

  1. On Windows XP (need to upgrade my shack PC), the serial mouse driver keeps the RTS pin HIGH, which causes the mic to key if nothing has taken ownership of the comm port that you are using (AGWPE, Digipan, etc) to bring it LOW.
  2. The pinout of the IC that I used was different than the one pictured in the schematic, don't blindly trust any schematic, do your homework first.  It saves solder (and frustration)
  3. Don't use too small of a project box, it is easier to do things if you have the room to do them in.

A couple of lessons that I learned:
  1. When if doubt, check solder joints.
  2. Follow the voltage, step through the circuit with a multimeter and make sure that you are seeing what you expect to see.
  3. Amperage kills...  This applies to ICs and other components as well as people.
  4. Be sure that the part is installed correctly BEFORE soldering...  

My Parts List:
  • 1 x 4N33 Optoisolator
  • 1 x 1K Ohm resistor
  • 1 x 220 Ohm resistor
  • 1 x IN4001 diode
  • 2 x 1/8" mono audio jacks
  • 1 x 6-pin mic connector to interface with my TR-7730
Time to Completion:
  • This part took me about eight hours due to lack of understanding and being too trigger happy with the soldering gun.  Next time should go smoother as hopefully I have learned my lesson on this.
Here are a couple of pics:

The IC and diode on the bottom right, and the two resistors on the bottom are all that make up this part of this circuit.  The other two resistors and the two transformers are for the rx and tx circuits.  You can also see the two audio jacks that I used to connect the PC and Radio.

This shows the completed and closed project box.  Again, while I at first thought that smaller would be better, after building it, I should have used a slightly larger box.  The next one that I build will be a bit bigger.

These are the cables that I built to connect the computer to the project box, and then on to the radio.  The gray DB9 connector attaches to the comm port for RTS based PTT.  The other end of that cable is an 1/8" mono connector that attaches to the project box.  The 6-pin cable actually has two pig-tales, one 1/8" mono for audio, and another 1/8" mono for the PTT signal.


And here is a shot of the APRS terminal showing me sending and receiving traffic.  I need a better antenna to hit more than one or two stations directly, but thankfully, one of the stations that I can hit is a digipeater/IGate.


All in all this project was a lot of fun and extremely educational.  It is also a LOT cheaper than buying another SignaLink.  I think that I have around $20 invested in this, plus my time.

73,

Richard, KK4JDO

Wednesday, July 4, 2012

Soundcard Interface for APRS/Packet

Happy 4th of July to all of my American visitors (and also to everyone else, although I don't imagine that it is quite the same).  Not that I have that many visitors from anywhere, but it's the thought that counts.  It's been a few days since I posted anything, so I wanted to get this up on the site.  I've been enjoying my SignaLink USB soundcard interface for digital modes on HF, but I would like to run APRS on the same PC, and running two SignaLinks with APRS can be problematic.  Besides that, I didn't want to spend another $70 to $100.  So I decided to build my own interface.  There is a great resource for this at: http://www.soundcardpacket.org/.  They walk you through the build options and troubleshooting if needed.  That being said, I've borrowed their schematics to post here (full credit for the schematics goes to them).

For this interface, you will need three connections, one for receive, one for transmit and one to activate the PTT switch on your radio to allow the transmission.  I am 2/3 of the way there.  I have the send/receive portions complete, and am waiting on the parts for the PTT circuit (it requires an opto-isolator, which I couldn't get from Radio Shack).

I tested the receive and transmit using DM780, which is part of the Ham Radio Deluxe suite, and was able have a QSO via PSK31 on 14.070MHz (manually keying the mic, which is annoying).  That being said, it seems to work well, and hopefully the parts will be in soon for the PTT portion.

Here is the schematic for the receive cable.  The radio that I am using (old Kenwood TR-7730) does not support audio out via the MIC at line-level, so I opted for the 1000:8 transformer to allow me to use the speaker out jack on the back of the radio:


And here is the schematic for the transmit cable:


These are fairly basic circuits and do not require a lot of time or effort to build out.

My Parts List:

  • 1 x 1:1 audio transformer (transmit cable - RS Part #274-1374 - these are getting scarce)
  • 1 x 1000:8 audio transformer (receive cable - RS Part #274-1380)
  • 1 x 100K Resistor
  • 1 x 1K Resistor
  • 2 x mono audio jack
  • 2 x stereo audio jack
Time to Completion:
  • This one took a few hours to put together, but quite a bit of time finding the right transformer.
Here are some pics:
(I nabbed the TR-7730 pic off of the net, but it looks identical to mine)


I decided to build this out as a stand-alone box with audio jacks instead of as a set of cables for neatness.  I'm an engineer by trade, and am rather stuffy about how wiring looks.  Stay tuned for the next installment in this post when I get the parts in the complete the PTT circuitry. 

73,

Richard, KK4JDO

Sunday, June 17, 2012

Mic Adapter

I was recently in a position where I had a 2m radio that needed a new mic.  Specifically, I have a Yaesu FT-2200 that I picked up from eBay on the cheap.  This supposedly perfectly working radio had a myriad of issues, one of which being a mic with two bad capacitors.  One solution was to go purchase a new mic.  Well, this is an older radio, so they don't make mics specifically for this rig any longer.  However, I was able to find a suitable replacement, the only down side being that said replacement cost almost as much as I paid for the radio!  That wasn't gonna happen.  Another option was to rewire a mic that I already own to use with this radio.  The downside was that I actively use both mics, one for my Kenwood TS-440S, and the other (wired for the Kenwood), I use via my USB PTT box with EchoLink.  So I didn't really want to rewire either of those.

The final solution was a mic adapter!  It was a little aggravating to build as I had to cross between two vendors that do things slightly different (Kenwood uses two grounds, one for the mic, one for the PTT, while Yaesu uses a single common ground).  But it wasn't really all that bad, and seems to work.  Now I just need to get my Moxon mounted where I can use it, and I can talk on my preferred repeater without being all scratchy!

My Parts List:

  • 1 x 8-pin female mic connector
  • 1 x 8-pin male mic connector
  • 1 x 1' length of mic cable (initially I used Cat-5e, which worked good also)
  • 1 x 3" length of 1/2" PVC
  • 1 x 1/2" PVC cap


Time to Completion:

  • It took around 30 minutes to make, including scrounging the PVC to hold the male side of the connection since I didn't have a non-chassis mount connector handy.


Here is a pic:


This was an easy project that was a quick fix for a problem, and certainly cheaper than buying a new mic!

73,

Richard, KK4JDO