Showing posts with label ts-440s. Show all posts

Sunday, January 20, 2013

PSK - Papa Sierra Kilo

Or, according to some: Poland Sugar Kilowatt and to others: Platypus Simultaneous Kraken.  Or maybe as it actually means, Phase Shift Keying.  This appears to be a typical mid-day mid-winter propagation on 15 meters today.  I'm guessing that I need to get on the air at a different time to get a different part of the world, but I am having a blast trying to work all of the countries in Europe!


I used to stick just to 20m for PSK, but one day I decided to branch out a bit.  I have shied away from 10m since I upgraded to General class a few months back, but on a lark I decided to give it a shot on PSK.  WOW!  I worked 15 new DXCC entities in that one hour session.  I am now hooked.  So given the success of that endeavor I just jumped in with both feet on 15m.  Once again, WOW!  I had really been missing out on the action by staying on a single band.  60+ QSOs and 31 new DXCC entities later I use the following schedule (time and work permitting):

  • 10m (28.120.15) mid morning
  • 15m (21.070.15) late morning
  • 20m (14.070.15) mid day
  • 40m (  7.035.15) evening
There is some blurring of those time frames, but that is the gist of it.  I don't have an antenna that works well on 80m, but I do listen there occasionally both phone and PSK, otherwise I would be working that band in the late evenings as well.  Why don't you give PSK a try and come have a QSO with me on the bands!

73,

Richard, KK4JDO

Saturday, December 1, 2012

Ham Shack Update

Well, with the exception of finding a Kenwood SP-120 speaker, I have just about completed a station that any ham from the late 80's to early 90's would be proud to call their own!

Just to brag (or whine, depending on time of day, my mood, and your point of view) my collection contains:

HF:
Kenwood TS-440S/AT (with FM module, IC-10 kit, Voice Module, tuner, and ALL optional filters)
Kenwood PS-430 power supply
Kenwood SP-430 speaker
Kenwood AT-250 outboard tuner (for 160m)
Kenwood IF-232C computer interface
Kenwood MC-50 microphone

VHF:
Kenwood TR-9000 (with ComSpec SS-64 tone module) 2m All Mode radio
Kenwood PS-20 power supply
Kenwood SP-120 speaker
Kenwood BO-9 base shelf
Kenwood TR-7730 (2m FM for APRS)
Mirage B-34-G amplifier with GaAsFET per-amp

UHF:
Kenwood TR-9500 70cm All Mode radio
Kenwood PS-20 power supply
Kenwood BO-9A base shelf
NEED THE SPEAKER!  ;-)

MISC:
SignaLink USB soundcard interface
Homebrew soundcard interface (cost <$20 and works just as well as the Signalink)
Homebrew coax tester
Homebrew LED ambiance lights ;-)
Homebrew PTT mic to PC interface
Wouxon KG-UV3D dual-band HT
Heath bench variable power supply
Radio Shack SWR/power meter
MFJ-941D antenna tuner
Cheap CW key

MOBILE:
Yaesu FT-2900R
Galaxy DX959
Radio Shack HTX-10
Radio Shack PRO-2050 scanner
Homebrew radio console

ANTENNA:
RadioWavz G5RV Lite
Homebrew 2m moxon
Homebrew 2m 1/4 wave ground plane

While this may all seem like an impressive list of equipment, it can all be replaced with one radio these days.  The Kenwood TS-2000, the ICOM 7000, the Yaesu FT-857D will each do everything that this entire list does and take up less space and power in the process!  Plus the new radios have DSP to clean up those weak signals.  On the flip side, all of the equipment listed didn't cost me what a fully loaded TS-2000 would cost.  So, pros and cons to each approach.

Anyhow, here is a quick pic of my shack (ignore the ugly desk, its not finished, and I'm an engineer, not a skilled wood worker, although I generally enjoy trying).


So anywho, there you go.  A shadowy flight into the ham shack of a man who does not exist...  Sorry, couldn't resist the geeky Knight Rider reference.

73 and good night,

Richard, KK4JDO

Friday, August 10, 2012

Installing an IC-10 kit into a Kenwood TS-440S/AT HF Radio

I use Ham Radio Deluxe, or more specifically, Digital Master 780, for most of the digital mode communications that I do (usually just PSK31).  This software is great and does a lot of awesome stuff.  One of those cool things that you can do with HRD is rig control.  This makes it easy to jump from frequency to frequency (QSY in ham-speak) from within the software, instead of having to tune the radio and adjust the software accordingly.  It also keep your PC up-to-date on what frequency your radio is on for automated logging (really help for lazy guys like me).

Anyway, since I have an older radio, I had to modify it with an add-on kit, originally called the Kenwood IC-10 kit.  Kenwood no longer sell this kit since they made the TS-440 over 20 years ago.  However, since this kit is just basically two ICs (an 8251A and a TC4040BP), they can still be obtained.  I got mine off of eBay for $20.  This will allow 4800 baud serial communications via the ACC-1 interface on the back of the radio.

You can then use a round 6-pin DIN connector and a DB9 connector to make a serial interface cable.  Be careful as the TS-440 ACC-1 interface uses TTL voltages (5V) and serial wants to use 12V, you will either need to use Kenwood's IF-232 kit to match the voltages, or use a USB-to-serial converter with normally operates at TTL voltage levels (beware Prolific chipsets).

The install process is fairly simple, it took me around 20 minutes to complete the installation, including the time it took to take the pictures.


This is a picture of the kit itself, basically a serial UART and a CMOS timer chip.  Be sure to take static precautions, it would be a shame to do this install and have it not work due to fried ICs.  Basically, just stay at the same electrical potential as the radio and you'll be fine.  Never touch the chip without touching the radio first.  You could also use a static strap, although I generally find this to be overly cautious unless you are working with extremely sensitive parts (or extremely expensive ones).

Below is a picture of the radio that we are about to perform surgery one, to wit, a Kenwood TS-440S/AT:

Step one is to remove the top cover, which consists of eight screws (four on top, two on each side):

Be sure when you remove the top that you keep track of where the speaker cable goes so that you can put it back together when you are finished.  It is the yellow cable in this picture:

Next, flip it over and repeat the process with the bottom cover (nine screws this time, five on bottom, two on each side):

After that, remove the three screws on the bottom of the heat shield (silver part to the right with the three holes).  Also remove the four screws (two on each side) that hold the front panel in place:

Then remove the two screws that hold the top of the heat shield on:

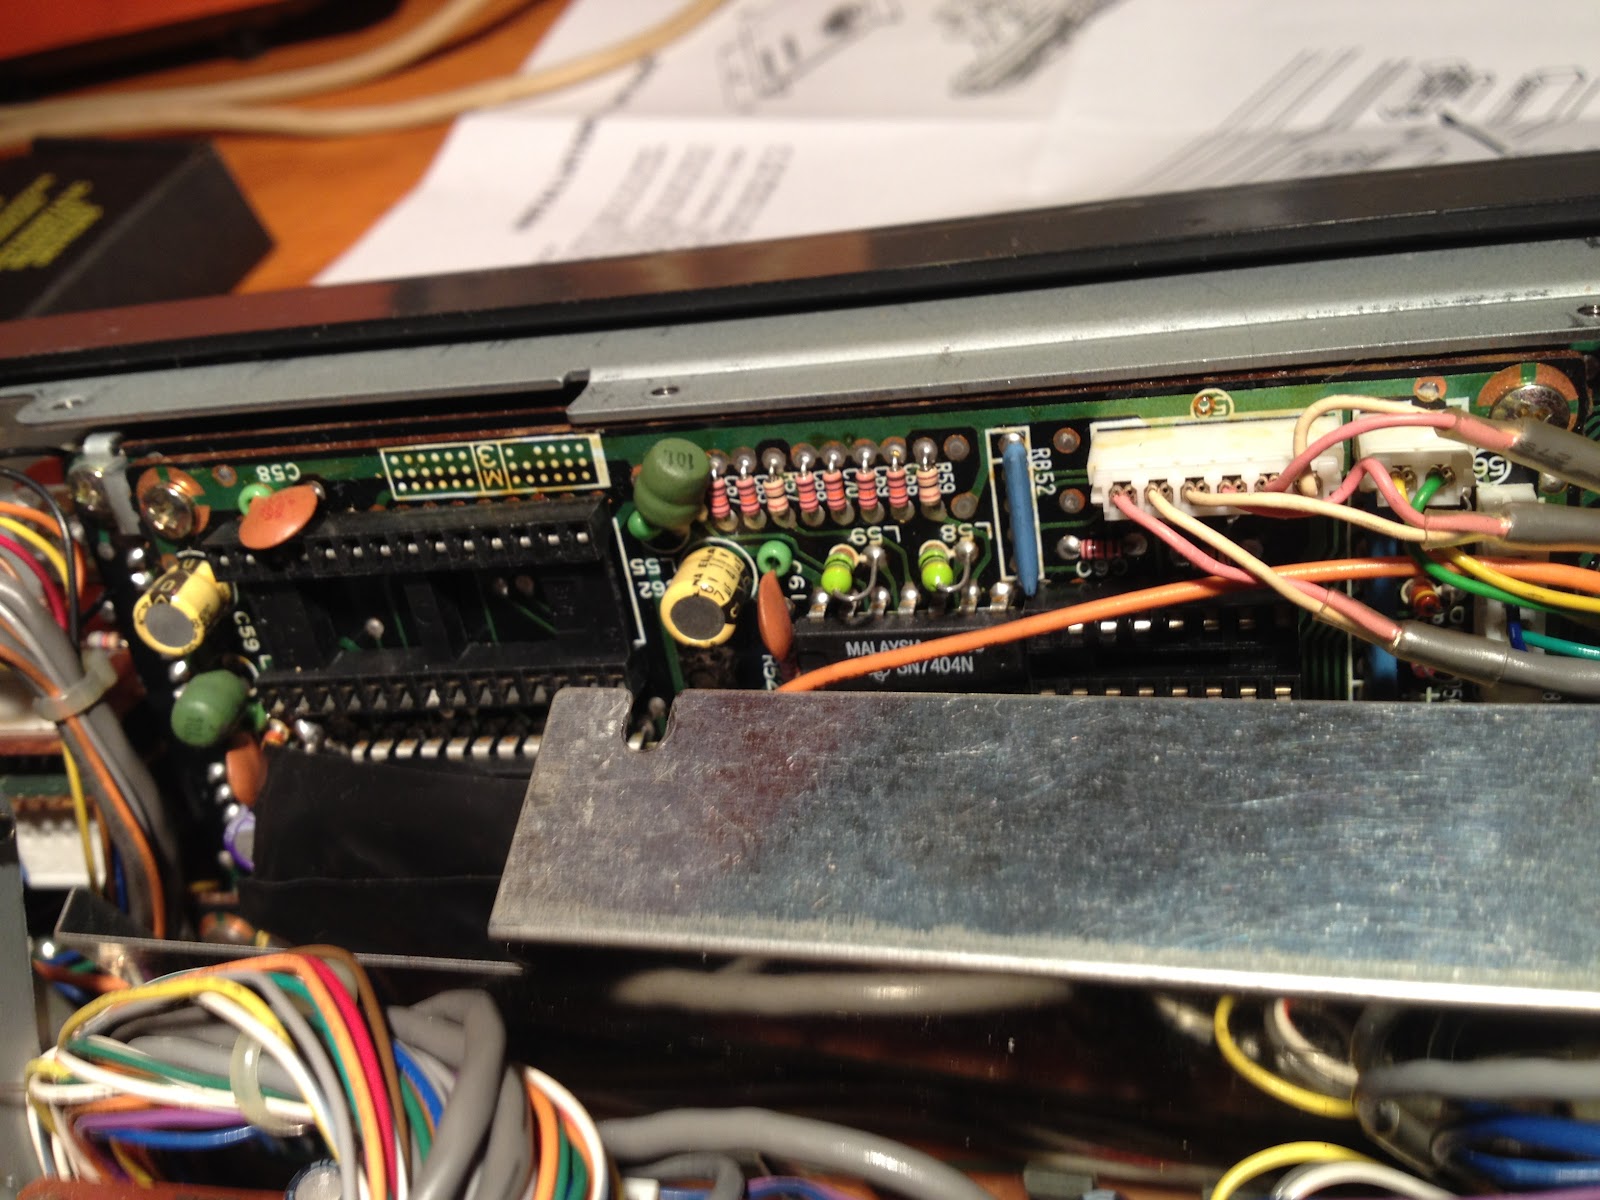
Finally, you will be able to see the two sockets for the two ICs.  The part of the IC with the half-circle indicates the location of pin one.  This view is from the top of the radio, and pin one goes to the left:

I forgot to take a picture before I put the heat shield back on, but this is what it looks like with the IC installed.  I had to compress the pins on the ICs a bit to get them installed, which is common.  Just be careful not to bend them too much, else they may break.

Put the radio back together in the reverse order of above, and you will be off to the races!

 This is the rig control interface for HRD, you can see where I have set the frequency to the 20m PSK calling frequency:

And this is the radio after reassembly and being controlled by the PC.  The downside to this is that you cannot control the volume, nor can you get current S-level readings from the radio back into the software like you can with newer rigs.  But being able to control a 20 year old radio via the PC at all is awesome!!


Put this project together with the soundcard interface that I build in an earlier post, and you have a fully functional rig for digital modes on the ham bands!  This was a really easy and fun project and I gained a lot of useful functionality from my rig!

73,

Richard, KK4JDO

Thursday, June 21, 2012

CW aka Morse Code

So, I want to venture into the land of CW and become a true ham.  When I first attempted getting into Amateur Radio over 20 years ago, in order to gain Novice privileges, you had to demonstrate proficiency in receiving (copying) Morse Code at five words per minute.  This turned out to be my biggest challenge, and the reason that I didn't earn my license back in the late 80s.  Fast forward to today, and I still want to master this.  So, I went to my local ham shop and picked up a straight key, which of course needs to be mounted on something so that it doesn't move all over while you are trying to use it.  This lead to a small project, and the topic of today's post.  This is a quick and easy project, and didn't cost much.  I went to Home Depot to see what I could find, figuring that a block of wood would work.  Well, I found that, and then something even better.  A chunk of base molding was the exact right size, and cost around a buck.  A quick coat of paint, and two screws later, and I had a functional straight key.  Now all I need to do it learn to use it!

My Parts List:

  • 1 x Chunk of base molding
  • 1 x Straight Key
  • 2 x Wood Screws
  • 1 x Some old spray paint.  ;-)


Time to Completion:


  • It only took a few minutes to mount the key once the paint dried, and only a few minutes to paint it.  The longest part was waiting for the paint to dry!


Here is a pic:


All in all, a simple, fun little project that hopefully will open up a whole new world for me!

73,

Richard, KK4JDO

Sunday, June 17, 2012

Mic Adapter

I was recently in a position where I had a 2m radio that needed a new mic.  Specifically, I have a Yaesu FT-2200 that I picked up from eBay on the cheap.  This supposedly perfectly working radio had a myriad of issues, one of which being a mic with two bad capacitors.  One solution was to go purchase a new mic.  Well, this is an older radio, so they don't make mics specifically for this rig any longer.  However, I was able to find a suitable replacement, the only down side being that said replacement cost almost as much as I paid for the radio!  That wasn't gonna happen.  Another option was to rewire a mic that I already own to use with this radio.  The downside was that I actively use both mics, one for my Kenwood TS-440S, and the other (wired for the Kenwood), I use via my USB PTT box with EchoLink.  So I didn't really want to rewire either of those.

The final solution was a mic adapter!  It was a little aggravating to build as I had to cross between two vendors that do things slightly different (Kenwood uses two grounds, one for the mic, one for the PTT, while Yaesu uses a single common ground).  But it wasn't really all that bad, and seems to work.  Now I just need to get my Moxon mounted where I can use it, and I can talk on my preferred repeater without being all scratchy!

My Parts List:

  • 1 x 8-pin female mic connector
  • 1 x 8-pin male mic connector
  • 1 x 1' length of mic cable (initially I used Cat-5e, which worked good also)
  • 1 x 3" length of 1/2" PVC
  • 1 x 1/2" PVC cap


Time to Completion:

  • It took around 30 minutes to make, including scrounging the PVC to hold the male side of the connection since I didn't have a non-chassis mount connector handy.


Here is a pic:


This was an easy project that was a quick fix for a problem, and certainly cheaper than buying a new mic!

73,

Richard, KK4JDO

Monday, June 11, 2012

The Obligatory Shack Pic

So now I can show you what all of those antenna are used with!  This is a quick overall shot of my "shack" as it stands right now.  I am considering some upgrade options in the near future, so stay tuned to see what kind of rig takes center stage (thinking TS-2000 for the shack and IC-7000 or FT-857D for the truck).


Included in this pic are:

Kenwood TS-440S, 20 years old and still talking around the world!  (just talked to Russia and Ukraine!)
Yaesu FT-2200 (look for an upcoming post on lessons learned about eBay)
MFJ-941D Antenna Tuner
Heath 3A power supply for testing purposes
Kenwood PS-30 for powering the TS-440S
SignaLink USB for APRS and other digital modes (trying to talk to the ISS, but need higher gain antenna)
Wouxun UV3D HT
Kenwood TS-120S (not feeling so well these days)
Homebrew PTT Mic to USB adapter to allow me to use my desk-mic with EchoLink (look for a future post)
Shure 256T desk mic
Kenwood MC-50 desk mic
El-cheapo CW straight-key (again, look for an upcoming post)
Radio Shack SWR/Power meter


Here are some more pics:


So that sums up my current shack.  More details as things change!

73,

Richard, KK4JDO